Introduction to Container Labs
This is an introduction to container labs to kick off your network lab journey.
DEVNET
Hari Shankar Yellapragada
5/8/20245 min read
Introduction:
You might be familiar with Docker; if not, don’t worry—I’ll explain it in more detail in a future post. For now, let’s talk about Container Labs, which leverage the power of containerization. Think of containerization like packing your belongings into a neat, organized bag for a vacation. Wherever you go, you can unpack everything quickly and efficiently. Similarly, with containers, you can easily package and deploy applications or systems across different environments.
Now, imagine if you could run network devices in a containerized style. Sounds pretty interesting, right? This is where Container Labs come in—allowing you to quickly spin up network environments, experiment, and learn in a flexible and scalable way.
To start this lab, I’m using an Intel NUC with 4 Cores, 64 GB RAM, and 1TB NVMe storage in my home lab. However, you don’t need this exact setup. You can run your lab in the cloud on a virtual machine or even on your laptop. Just keep in mind that a less powerful device might limit the number of containers you can run simultaneously.
For virtualization, I’m using Proxmox, a Type 1 hypervisor, to manage my virtual environments. This allows me to maximize the efficiency and scalability of my home lab setup.
Installation of Docker and Containerlab:
Before we dive into containerization, let’s ensure our environment is set up properly. For this tutorial, I’ll be using Ubuntu 22.04 on my virtual machine. While I won’t go into the installation details for Docker or Container Lab on different hardware, you can refer to Docker’s official documentation and Cotainer lab Installation for more specific installation steps based on your system.
1. Update the system: Make sure your virtual machine has the latest package lists.
2. Install prerequisites: Install necessary packages like ca-certificates and curl for secure connections and downloading files.
3. Add Docker’s GPG key: This ensures the authenticity of Docker packages you’re about to install.
4. Add Docker’s repository: We configure Ubuntu to pull Docker packages from the official Docker repository.
5. Final system update: Refresh package lists to include Docker’s repository.
To install all the dependencies of Containerlab, you can use either Quick method or manually installing individual components.
Launching Your First Containerized Network Device with Containerlab
Now that you’ve successfully installed Containerlab, it’s time to launch our first network device. This part can get a little tricky, as each manufacturer uses different network software images. For example, if you need Cisco images, you’ll need to register on Cisco’s official website and download QEMU or QCOW2 images
Each platform provides specific instructions on what formats are accepted. If you want to install a Cisco CSR1000V, you’ll need to navigate to the vrnetlab/csr directory (this directory is part of the vrnetlab repository we cloned earlier). In the README.md file, you’ll find key details, such as license handling instructions.
Here’s an extract from the file for clarity:
License Handling for Cisco CSR1000V
You can feed a license file into CSR1000V by placing a text file containing the license in the same directory as your .qcow2 image. The license file should have the same name as the .qcow2 file, but with a .license extension.
For example:
• If your image is named csr1000v-universalk9.17.03.02.qcow2, the license file should be named csr1000v-universalk9.17.03.02.qcow2.license.
Once you have the .qcow2 image and the corresponding .license file, you’re all set to launch your first containerized network device!
Connecting to Your First Network Device
Let’s dive into setting up your first network device! Before we get started, let’s clarify some parts of the command we’re using here:
Why specify version 16.07.01 instead of the latest?
• Answer: The version number (e.g., 16.07.01) refers to the specific software image I downloaded. This number can vary depending on the downloaded version, so it’s not a standard for everyone. If you have a different version, adjust this part of the command accordingly.
What does 5000:5000 mean?
• Answer: The first 5000 on the left is the port on your host machine that will be mapped to the container, allowing telnet access. The second 5000 on the right is the port inside the container where the network device is accessible. This setup enables you to connect to the containerized device.
Hurray! We now have a network device.
But wait—have you wondered why the IP address is 10.0.0.15?
Based on the explanation from the Containerlab official site, this could be due to the default network ranges overlapping with the existing addressing scheme on the lab host. Alternatively, you might want to assign predefined management IP addresses for better control.
One important note: when configuring your lab, you should start your IP assignments from GigabitEthernet2, since GigabitEthernet1 is reserved for Containerlab management.
Now, you are free to delete the Docker container we created earlier as you begin making your network topology.
Creating an OSPF topology
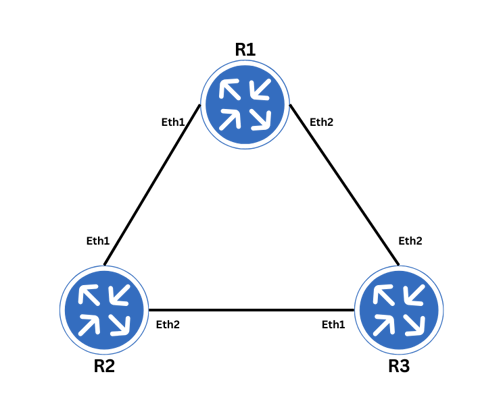
I’m using the following topology for my OSPF lab, featuring routers R1, R2, and R3. Each router is interconnected to form a triangle, with two links between each pair. This setup will help simulate a realistic OSPF environment.


If you’ve ever used GUI-based network labs like GNS3, EVE-NG, or CML, creating links between devices is as simple as connecting two icons—no detailed explanation is needed. However, in a Containerlab topology, you need to define these links explicitly in a YAML file.
- endpoints: ["r1:eth1", "r2:eth1"]
- endpoints: ["r2:eth2", "r3:eth1"]
Additionally, managing different topology setups requires organization. Personally, I keep each lab in a dedicated folder, which contains startup configurations for each device along with the .clab.yml topology file. This approach makes it easy to manage and revisit different lab environments.
You can start your topology by simply running containerlab deploy from within the corresponding folder. However, to make things more professional and organized, you can also add a startup-config.


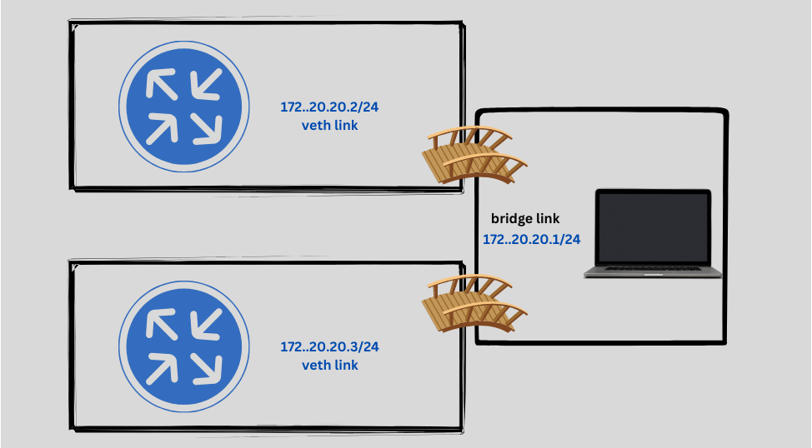
Docker bridge will have a network, for instance, 172.20.20.0/24 network range. every container got an ip address from this range. The issue i faced while ssh to the host is Diffie–Hellman key exchange. I had to enter same ssh long command to bypass that.
To solve this, I add this to my /.ssh/config
Important commands to remember
Here are a few commands that might come in handy as you work with Containerlab:
Now, it’s up to your imagination! Create your own topology and dive deeper into the exciting world of network connectivity. The possibilities are endless, so experiment, explore, and continue learning.
Thank you for reading this blog! If you have any questions, suggestions, or feedback, feel free to reach out or drop a comment. I’d love to hear from you.


Explore More at NetworkDock

Insights
Explore the exciting world of network automation.
Connect
Network Dock
connect@networkdock.info
© 2024 Network Dock. All rights reserved.
Join Forces
Legal


